Tips and Tutorials \ PLUTO Contribute - Posting in the News section
This tutorial presents all the simple steps to add a new post in the News section of the portal.
Type: How-To
Prerequisites
- basic knowledge of git and Gitlab
- having a CNES Gitlab account (if you don't, contact us at l-pluto-support@cnes.fr)
This tutorial will show you all the simple steps to post News in the portal:
- Get the source code of the PLUTO portal and create your own working branch
- Add your profile information in the Authors list
- Create a new markdown file describing your news
- Test the code on your local browser
- Push your code and create a Merge Request to publish it on the official website
1) Get the code
First clone PLUTO repository on your machine. To do so, create a folder anywhere and in a terminal type :
git clone git@gitlab.cnes.fr:pluto/portal.git
- it is important to use the ssh command (not https)
- from outside CNES network, add your username in the clone command line :
git clone gu=<username>@git@gitlab-ssh.cnes.fr:pluto/portal.git - in this beta version, you need to be a member of the pluto group. Contact l-pluto-support@cnes.fr if you are not in the group. you can find more details here if you have difficulties getting the source code.
Create a new branch from the cloned folder :
cd portal
git checkout -b my_working_branch
2) Register as News Author
Open the docs/blog/.authors.yml file. Add your information in the format :
username:
  name: Pluto Team
  description: Portal Guide
  avatar: ../assets/images/pluto_dog.png
  email: l-pluto-support@cnes.fr
warning : please respect the file indent :)
| Section | Description | Status |
|---|---|---|
username |
A new name, of your choice. | mandatory |
name |
This is the name that will appear in the blog post. | mandatory |
description |
A very short description of the new Author. | mandatory |
avatar |
You must add a profile picture. Please put the image in the data/blog/authors_avatar folder. | mandatory |
email |
The author's email address. It will not appear on the blog post but the Pluto team will know how to contact the author if necessary. | mandatory |
3) Create a markdown file
Create a new markdown file in the docs/blog/posts directory:
docs
|-- blog
    |--posts
        |-- name_of_your_choice.md
4) Fill the markdown file
The easiest way for you to add a tool is to get the template mardown and fill it.
Here is an example :
---
authors:
 - pluto
categories:
 - Demo
tags:
 - beta
date: 2024-05-23
---

# Title of the post

Any blabla of your choice here :) This text will appear on the post overview in the News list.

<!-- more -->

Under the <!-- more -->, the text will be hidden. Users will have to click on "continue reading" to see it.
The metadata must be written inside --- tags. Here is a description of all values. Some are compulsory, some are optional, fill free to adapt to your own case. The order in which metadata are written is not important.
| Section | Description | Status |
|---|---|---|
authors |
The username you put in the data/blog/.authors.yml file. You can indicate more than one author. |
mandatory |
categories |
There are free categories that will appear in the post description. Clicking on them will filter the posts with the same category. | optional |
tags |
Free tags that will appear on top of the post. | optional |
date |
The date of the News. | mandatory |
In the free text section, you can use all usual markdown functionnalities.
Click here for some markdown tips
If you are new to Markdown, here are some documentation and a free online editor.
- The markdown syntax to add an image is:
 - If you want to specify the width of the image (resp. height) and want to align your image to the left, you can use this syntax:
{: style="width:300px;margin-left:0"} - Adding a link in the text is also simple:
[link](https://link)
Note
- If you add images, please put them in the posts folder: docs/blog/posts/assets_yourpostname, and refer to them with relative path.
- If you want to link to a PLUTO tool (or any PLUTO page), use a relative path to the corresponding md file:
[link to OTB tool](./../otb/otb.md)
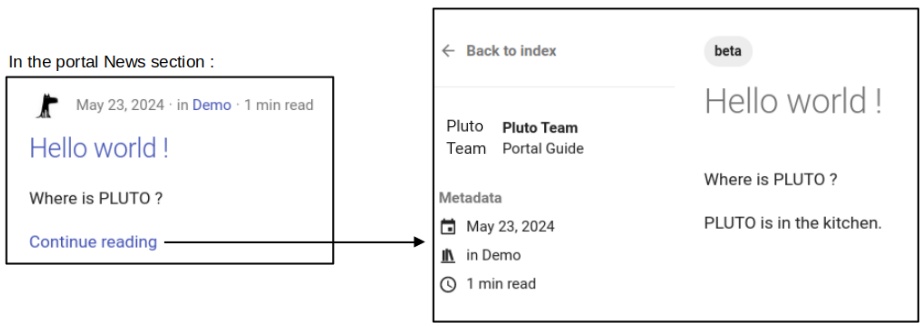
Here is an example of what you should have once you've created a new post. Go to the next section to learn how to test it !
5) Test it
Install mkdocs : on a terminal, run pip install mkdocs-material mkdocs-rss-plugin mkdocs-include-markdown-plugin pydantic pandas tabulate ruamel.yaml.
We advise to create a new virtual environment.
At the root of the project (portal folder), use the command mkdocs serve -w . --no-directory-urls to display the result on your local browser.
You can check if your post appears in the News and if all information are correctly displayed when you open the page. If not, you may have a mistake in the format of one of the metadata.
6) Share it
Commit and push your code, then create a Merge Request on Gitlab. An automatic CI pipeline will run as a first check. If you have errors, please check the log by clicking on the pipeline on the Merge Request page. You can update the Merge Request with new commits.
Note that you can download the CI build artifact on Gitlab to get your local version of the site in a zipped folder.
Your code will now be reviewed before merging to the official website. If any modification is needed, an admin will contact you to explain the needed steps.
Any trouble ? Ask the community or contact us on the forum.
See Also
- PLUTO Contribute - Adding a new tool to the Catalog
- PLUTO Contribute - Adding a new tutorial to the portal
Contacts
Questions ? Get help on the Forum